Uncategorized
Blending Sizes for a Fuller Waistline
Greetings my lovelies – and I hope you and your family are well and happy today.
My Teachers Hat 👩🎓 today is about my favourite subject – you all know them and they are our BEST FRIENDS – DARTS of COURSE !!…lol..
My latest pattern release – the Brenda Dress – even thought made in a scuba knit – has darts both back and front – in both the bodice and the skirt pattern pieces.
Darts give a fabulous silhouette to the garment – and are also a great fitting and adjustment tool – to enable you to get the best fit of the garment to your body.
We are going use our darts to help us fit a fuller waist on the Brenda – and I am using the Brenda Dress pattern pieces as my base for my demonstration.
And shoutout if you have any questions. Our Facebook group can be found here or over on Instagram here.
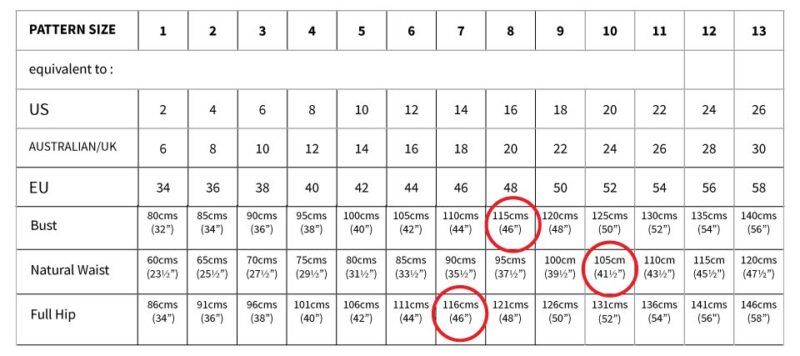
The above chart is my sizing chart that is used for size selection for all Designer Stitch patterns.
For todays demonstration purposes the sizes we will be working with are circled – above in red – and are Bust – 115 cms (46″), Waist 105 cms (41 1/2″) and Hips 116 cms (46″).
We have a body that has a Waist area 2 size symbols bigger than Bust size – and 1 size symbol smaller in the hip area.

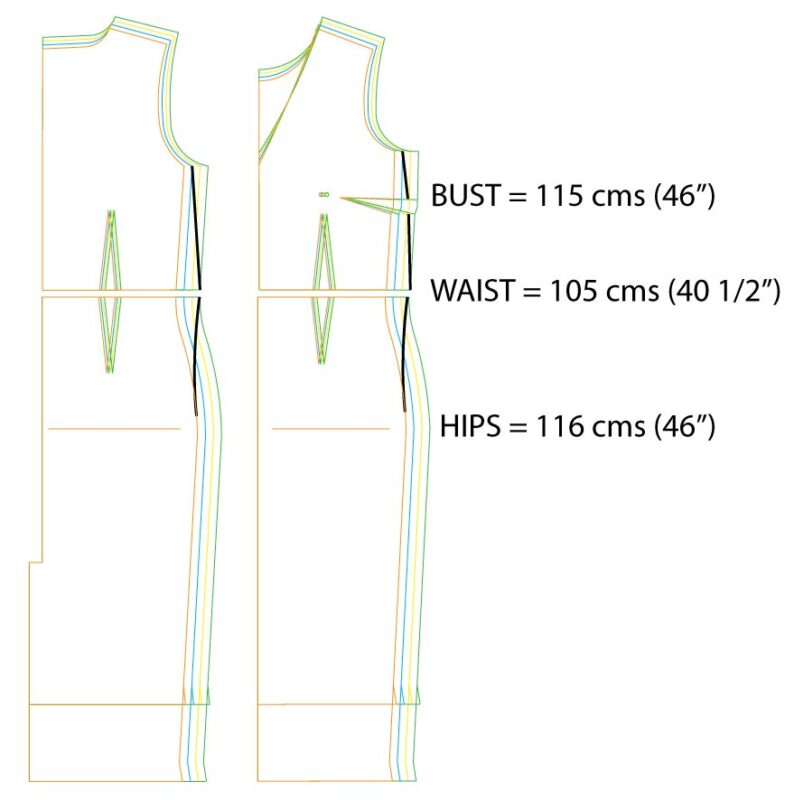
If I was just to trace off the above sizing on my layered pattern you will see – from the above image – that the waist kicks out – and then has to kick back in for the hip area.
What I would like to do is use some of the existing dart value to maintain a better side seam – after all our bodies are shaped throughout their entire circumference.
Shaping of a garment – fitting of a garment – is NOT done SOLEY at the side seam. It done throughout the circumference of the pattern piece.

The above image shows that I have instead drawn a vertical line from my size selection at Bust – and then squared it down to the waist.
I have then blended from this same point – at the waist of the skirt section – and curved it slightly back into my size selection at the hipline.
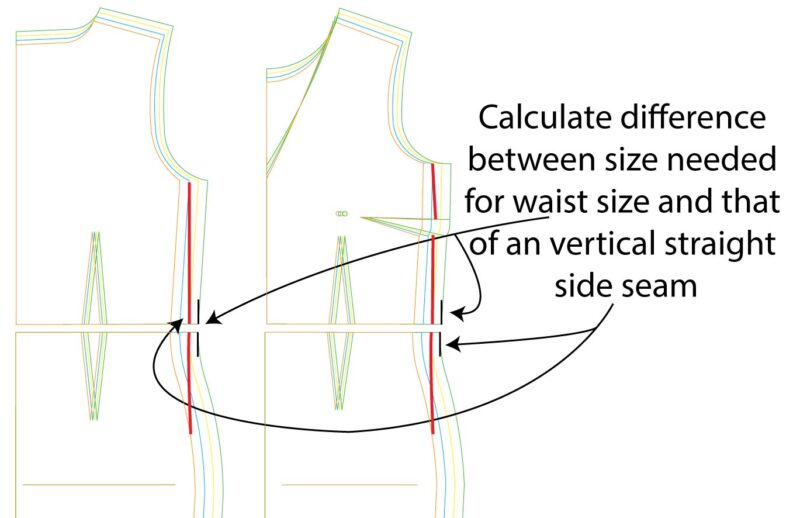
What we are going to do now is calculate how much extra we need to accommodate for – at the waistline – which is the difference between the size I need (black line) – and what I have now (red line).
For example when measuring the spacing – when developing these images – there was a 1.25 cms (1/2″) difference between both – on both back and front waistline areas.

I am going to now use the dart width – or dart value – and reduce the them by the amount that I have calculated above.
For example the Back dart width – on both bodice and skirt – is 2.5cms (1″) – so I have reduced that by 1.25 cms (1/2″). Both the dart on the back bodice and back skirt is now 1.25cms (1/2″)
The Front dart width is also 2.5 cms (1″) so I have calculated it the same way as I did for the back.
This is an easy and effective way to fit a garment using some of the dart value to enable a sound side seam.
If there was a bigger waist discrepancy I may have to kick out the side seam – maybe 1-2 sizes up – as I would still like to keep some of the dart value in place as darts are there for a reason. To create shape in the garment to accommodate your body shape.
I hope that you may add this to your sewing knowledge database.
The good thing about sewing and fitting our bodies – we always learn NEW THINGS.
Love to you all xx
Cheerio
Ann xx