Tutorial
How to Create a Separate Button Stand on the Sedona Shirt Dress
Greetings my lovelies and thank you for joining me here on Day 5 of the series of Sedona Shirt Dress blog posts.

I hope that you enjoyed reading the last 4 days of blog posts and if you have missed them here are your links. They make great reading.
Day 1 – Sedona Shirt Dress Inspiration and Influences Post.
Day 2 – Sedona Shirt Dress Tester Roundup Part 1
Day 3 – Sedona Shirt Dress Tester Roundup Part 2
Day 4 – What is a Concealed Button Wrap – which is one of the main features of the Sedona Shirt Dress PDF sewing pattern.
Today I am going to show you how to create a separate button stand on the Sedona Shirt Dress

The above pic shows a shirt dress with a separate front button stand. This is a great example as you can see that the button stand has been cut on the opposite direction of the stripes of the yoke when compared to the lower body.
Shirt dresses with separate button stands are very common in the RTW world and can be seen very strongly right across Pinterest and also Instagram. They are such a key wardrobe item at the moment.
So lets start this easy pattern making technique and follow the steps below – and don’t over think this – it is a very EASY process.
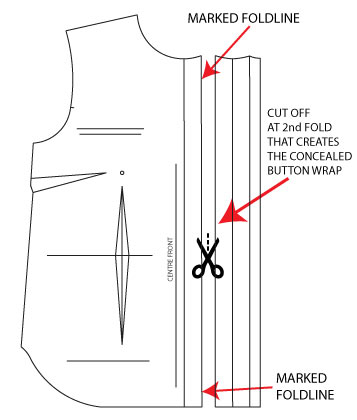
Step 1.
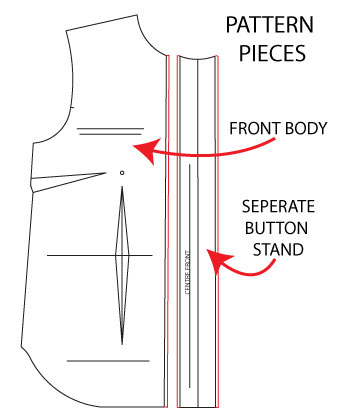
Using the front pattern piece cut along the 2nd marked “FOLDLINE” and separate.
Discard the right hand section you have cut off.
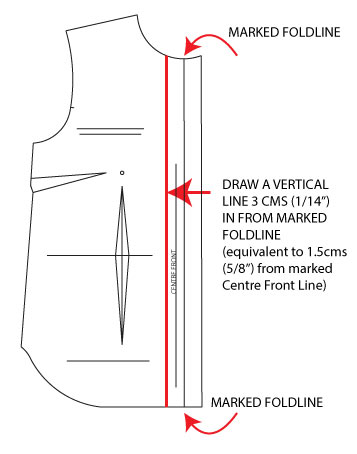
Step 2.
Draw a vertical line 3cms (1 1/4″) in from first marked FOLDLINE which is the equivalent to 1.5cms (5/8″) in from marked CENTRE FRONT LINE.
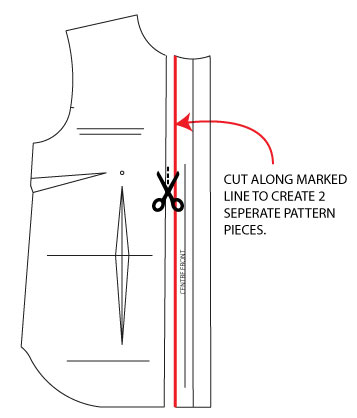
Step 3.
Cut along this new vertical line that you created in Step 2.
You will now have 2 separate pattern pieces – one is your front body and the other will become your new separate button stand.
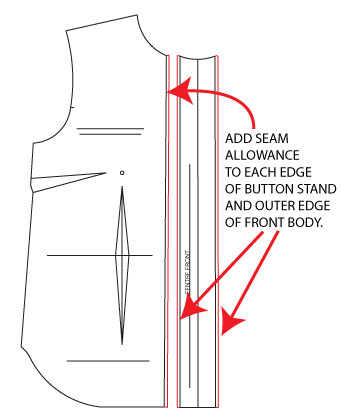
Step 4.
Add seam allowance to each side side of your separate button stand and also to the edge of your front body. Here the seam allowance as used in the Sedona Shirt Dress pattern would be 6mm (1/4″)
Step 5.
Name your new pattern pieces – Front Body and Separate Button Stand.
Interfacing would be applied to 1/2 of the separate button stand.
How on earth did I work that out ?
Lets talk a bit about the anatomy of the above pattern. When I drafted the front body I made the button wrap width 1.5cms (5/8″) – it is drafted as an extension beyond the Centre Front Line. A minimum standard of button wrap width is 1.2 cms (1/2′) as anything smaller doesn’t allow for the centre front to wrap over and hold the garment.
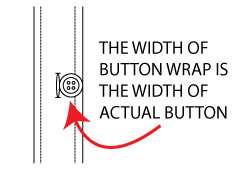
Also the width of the button wrap must reflect the recommended size of buttons.
As the above pic shows the button wrap width must be the same size as the width of button – so if we sit the buttons left edge against the centre front the buttons right edge must be inline with the garments finished edge.
And that is IT !!!…wasn’t that an easy re-mix of a Designer Stitch Pattern – the fabulous Sedona Shirt Dress PDF sewing pattern.
And tomorrow keep your eyes out for the next blog post – a more in depth discussion on the correct position of buttons and buttonholes – and vertical versus horizontal buttonholes – The Correct Position of Buttons and Buttonholes.
Cheerio
Ann at Designer Stitch.
Oh – ps !!!…. The finer details : On Sale for a limited time only – $8.75 (US)
multi-sized pattern – including Cup Size B thru DD (E) :
(AU/UK) 6 – 26
(US) 2 – 22
(EU) 34 – 54
Intermediate Sewing Level.
https://designerstitch.com/shop/sedona-shirt-tunic-dress
Great instructions! Thank you.