Greetings my friends. And thank you for coming over to join us for the Amira Dress Pattern Testers Roundups – Part 2.
Our pattern testers have made the most spectacular Amira’s – as I am sure you all agree – and you will see how each Amira dress fits so perfectly.
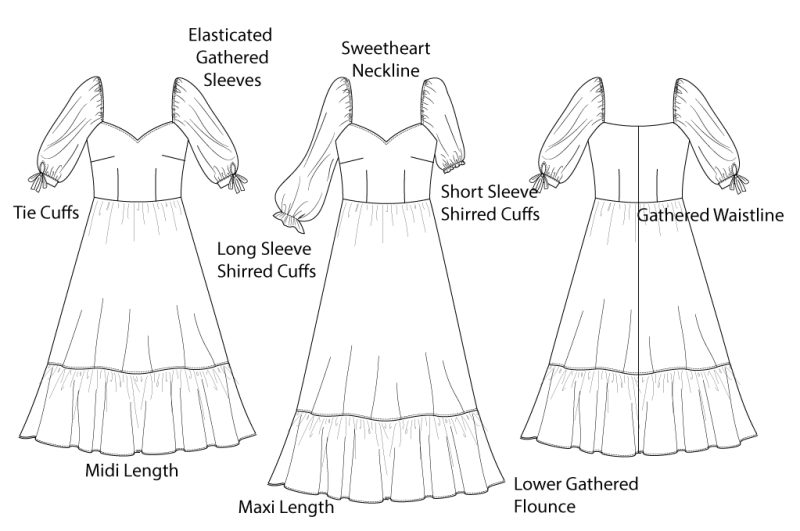
The Amira offers a sweetheart neckline along with a slightly gathered waistline skirt with an attached lower flounce.
The key feature – and what also helps to frame the face – are the elastic gathered sleeve head along with shitted cuffs or gathered into tie cuffs.
Although the dress may look complicated to make – as usual for all of Designer Stitches designs – it is really quite a simple make.
Of course there are elements like an invisible zipper in CB, front and back neck facings, and of course the elasticated sleeves – but that is about it!
Probably the hardest thing will be to choose what fabric you will make the Amira Dress in as I can very much guarantee that you will be wanting to make more than one.
So, my friends, lets continue with Part 2 of the pattern tester roundups – the Amira Dress.
And as always, our roadies would like to share with you all the following:
1. Their name and where they live?
2. What fabric combinations did you choose and where did you purchase.
3. What sewing tips can you share when sewing the Amira?
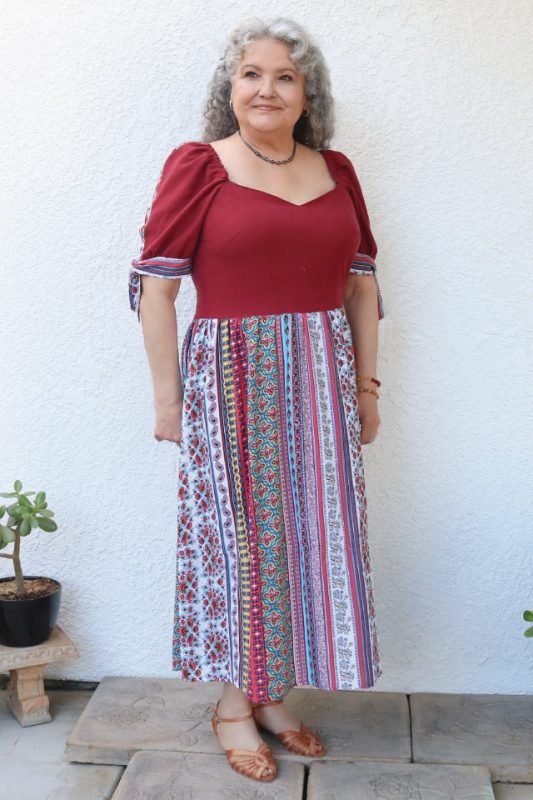
I love maxi dresses,so my option was the maxi length. The cool thing is that if I don´t like the maxi length anymore I can always make it shorter! I can take the ruffle off, or I can take the ruffel off and make the skirt a bit shorter and the ruffle and so I can adjust the length in various ways.
My tip for making the Amira is, to make a toile to adjust the fit. The front and back are easily adjustable to get the best coverage for your bra bands. Also, to decide the length of the elastic on the shoulders I suggest after you insert the elastic try the dress on and adjust the length before you finish it off.
I love my Amira and I am just waiting for some warmer days to enjoy it!
You can find a full review , with tips and tricks and a closer look at this pattern, on my YouTube channel
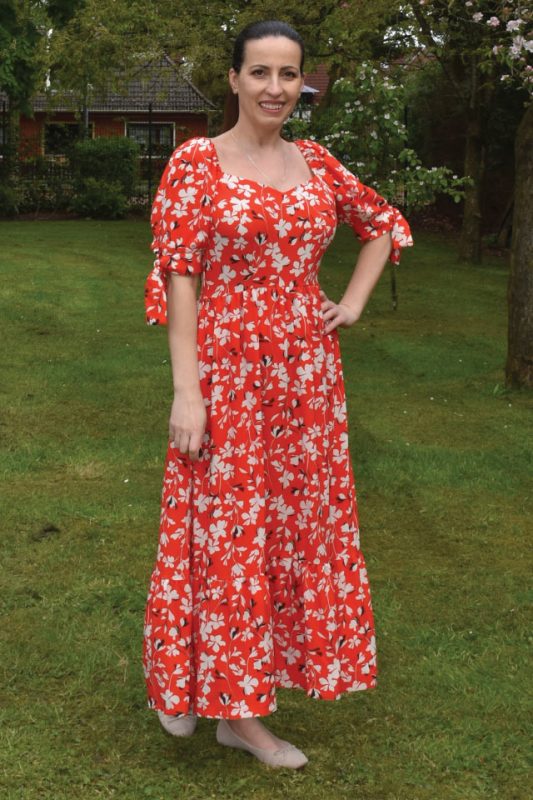
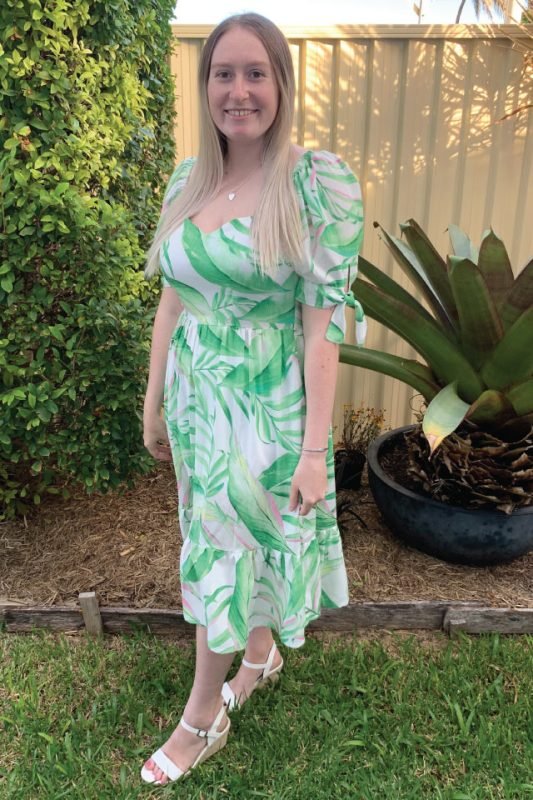
I absolutely love my Amira dress and see a couple more in my future. I chose the midi length with tie sleeves in a beautiful Rayon from Joann Fabrics.
My fabric was a little shifty to work with so stay stitching my bodice necklines helped a ton.
The pockets are a must have! They are a great depth and height for the dress. I did have to shorten my dress a little as I’m only 5’3″.
My husband loves this dress on me and I’ve had a few friends who have complimented it as well. So much so, one friend is requesting this as her birthday sew from me this year!
Hi, my name is Beck and I live in Melbourne, Australia. I really enjoyed sewing my Amira dress and I love the fit of my final dress. I blended sizes for my waist and upper arms and with Ann’s help I was able to get a great fit at the top of the bodice. I used a chambray fabric which is a favourite from my stash that was just waiting for this great pattern.
Hello Lovelies, this is Brenda from the Netherlands.
For this test I made 2 dresses, both in different fabrics. The lighter blue is a viscose and the darker blue is a cotton poplin.
Both fabrics are from www.driessenstoffen.nl
On the lighter blue I didn’t add the ruffle at the bottom and added the tied sleeves. The darker blue does have the ruffle and has the Shirred sleeves.
I wore the light blue dress to my brothers wedding, our family all wore blue. Everybody loved it.
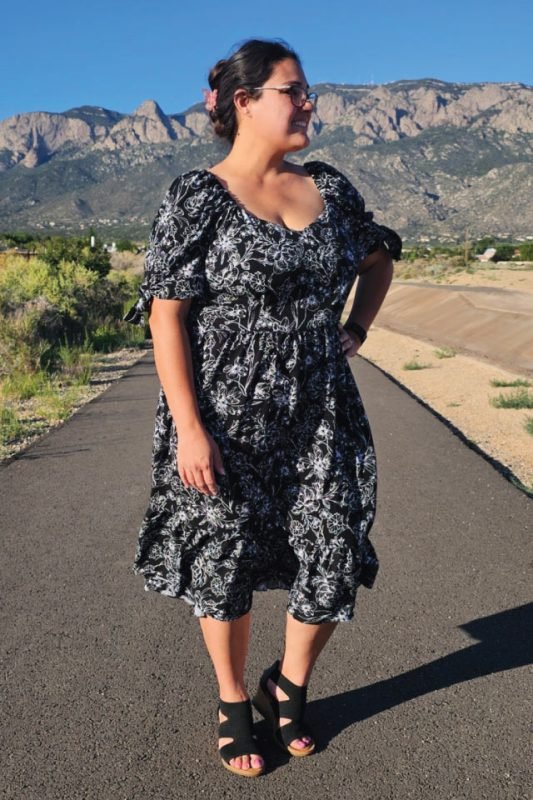
Hi, my name is Synthia and I live in Central Ca. When I first saw the Amira dress, I visualized sewing up a Boho style dress. I made the midi length, was hoping for an true elbow length sleeve, and I used rayon fabric. My fabric for my final did not show up on time, but I love how my first Amira turned out. For my next Amira dress, I will lengthen the elbow sleeve to fit right at my elbows, or maybe use the long sleeve version with the midi length version again. I love the sweetheart neckline and the optional back lengths, one low and the other modest. Tips, as always sew a muslin, grade your sizes as needed on the pattern, and don’t be afraid of ripping apart and re-do to get the proper fit. You will love the Amira dress and will look great in it as the rest of the testers do. https://sewsynsewn.blogspot.com https://www.facebook.com/Synthia20000/
Hey my name is Candice and I live in Townsville, Australia. I made 2 Amira dresses both in rayon purchased from spotlight however both fabrics are now discontinued. ( https://www.spotlightstores.com ). I decided to make the Amira dress in the midi length with tie cuffs. I was fortunate enough to have a great fit first try which made my toile wearable as there were no adjustments needing to be made. In the future I definitely plan on trying out some cotton or gingham fabrics for the perfect spring/summer dress however I do love the drape of the rayon for the skirt and sleeves. As it is coming into winter I haven’t had a chance to wear the Amira dress yet but I’m sure when it comes into spring/summer it will get plenty of wears. If making the tie cuff sleeves don’t be like me and cut the triangle out of the sleeve when cutting out the fabric because it will make it very difficult to then apply the lining. I learnt the hard way unfortunately but I had it perfected for the second dress I made. I had such a wonderful time making this dress and loved seeing everyone else’s. I can’t wait to make my next one as it is easy breezy once you get the instructions down.
Hi, it´s me again. Christine M from the Netherlands.
I used a fun and light crepe with lovely balloon print and a border. I had to change the direction of the fabric to get the border at the bottom, but it turned out really cute. I fully lined the bodice, because it´s a little see trough.
I made the longest version with sirred sleeves. I love shirring. It´s such a mesmirizing thing to do. If you want to try shirring on your machine, make sure to not to stretch’s the elastic when winding it on the bobbin.
I haven´t really worn my Amira dress, because the weather is awefull in Europe at the moment. But I´m going to the south of France within a few weeks, so I´ll be wearing it a lot.
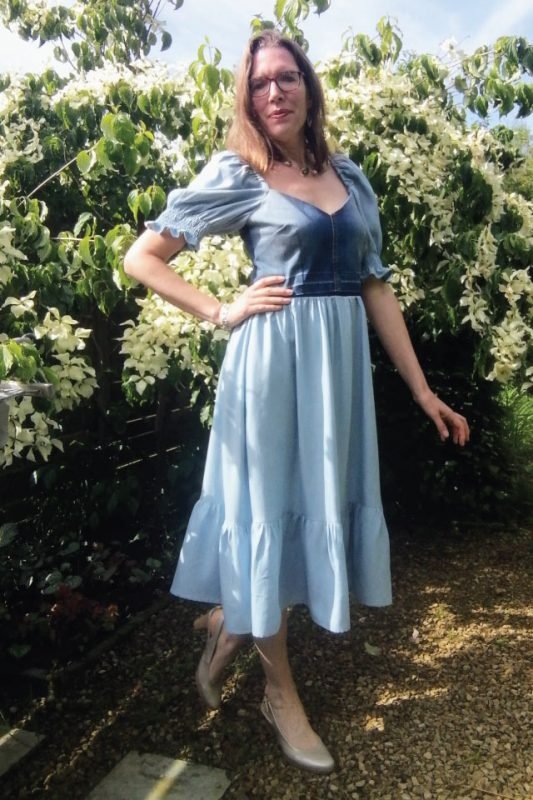
Hi, I’m Karen from Belgium. My Amira dress was a bit of a quest. I had a light blue jeans version in mind. The first toile needed a lot of adjustments. I had to bring the points in and had to do a small cross back adjustment. I chose the mid version with shirred sleeves. I’m happy with the fit, but think a busy print would have been nicer. The bodice is an upcycling of a jeans skirt. Still thinking about a way to make the dress more my own style and I’m sure I will find inspiration in all the beautiful Amira’s that I saw.
Hi, I am Marieke and I live in the Netherlands.
As some of you might know already, I adore the patterns from Ann for years now. Till thisfar I never made a pattern from her which I didn’t like. Then it’s probably not a surprise that this dress is a new favorite too!
I have to admit I was wondering how it will look at me- since my bodyshape is a triangle- and the sleeves are putting the attention to the shoulders the most.
But as always, I just trust Ann- and also fabric is playing a huge roll in the results.
So, I doubted between a plain or a fabric with a print and decided to use a bold digital viscose crèpe fabric.
The dress has a lot of details but they are visible enough to go together with a bold fabric I think.
As said, I am pretty familiar with Ann her patterns and went for my usual sizing- which turned out as a perfect fitting dress- as always lol.
When I tried it on I was happily surprised my thoughts where correct and I love it even more then I expected!
Funny enough, the dress itself is pretty bold as well with all the details, but all together it turns out as a chic but subtile dress.
The dress makes me feel elegant and mature on a good way.
And there was no better place to take pictures in a green surrounding to fit the background without me fading.
And that’s actually exactly what this dress is: subtile, elegant without taking to much attention away but still unique.
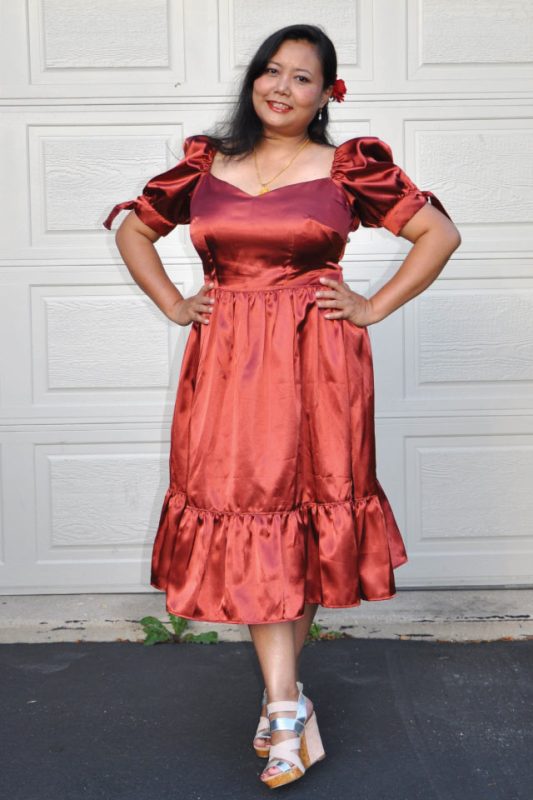
I made my Amira with this gorgeous satin fabric I have been saving for some time now. Amira is the perfect pattern it has been waiting all along ❣️.
For this pattern especially when working with satin or slippery fabrics, I suggest you to either use pins or basting. Also, don’t forget to iron after every step. It’s a very pretty pattern and I have worn it at a friend’s party and everyone loved the details especially the tie sleeve. I made mine a midi length with lower back cut and is perfect for Illinois summer .
I am planning a maxi-length in soft rayon fabric as I plan to wear it for an upcoming lunch party. If you like to see more of my sews, check out my Instagram.
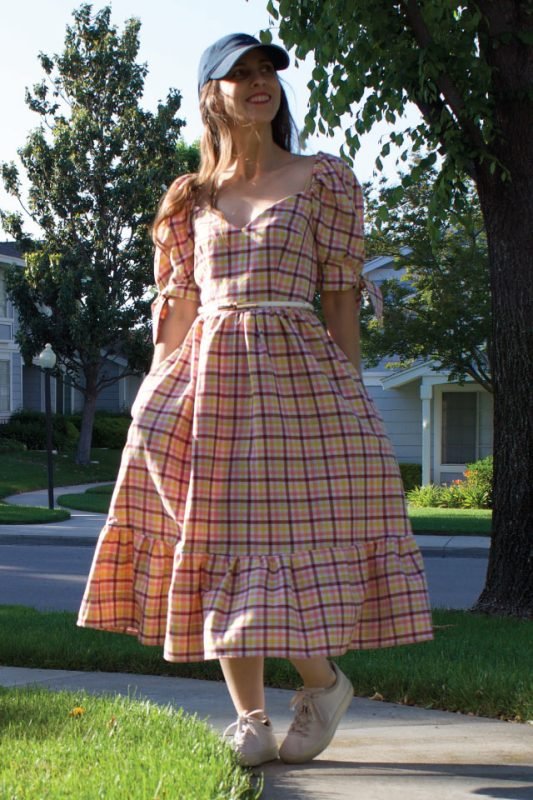
2. Light-weight double sided cotton (NOT quilters cotton) from a local fabric store. I wanted something that felt like summer so found this pink, yellow, white, and I think maroon, plaid.
3. Do a mockup first! And if you do plaid, make sure to get enough of it to match the lines–I was able to match up most of the plaid! Turned out super cute!
4. I did the tie sleeves, and technically knee length but it turned out to be midi length on me (exactly why a mock-up is necessary!) since I’m 4’11”.
5. I definitely had to do a SBA; I’m a 28B for reference.
6. Not yet but I plan on wearing it this Saturday for a trip to San Diego!
7. Yes–but I’ll be raising the neckline about 1/2″-1″ for a more modest neckline for a wedding I’ll be attending later this month with the tie sleeves, and without the flounce at the bottom.