Gaping Armholes – Contour them with Darts
Hi Ho my friends. Ann here from Designer Stitch and I am back with another fitting post in the Sew Busty fitting series – answering your questions about any fitting dilemmas or problems that you may encounter when sewing all of your fabulous me-made clothing.
And I bet you cannot even GUESS what I am going to talk about today?.
You guessed ? – well YES – my favourite subject of all time. DARTS !!!
As you may know I have a huge love affair with darts. And all things DART related.
Darts are the ESSENTIAL fitting tools of a well made and well fitted garment.
So today I put on my My Teachers Hat 👩🎓 -this is what I call my how-to’s over in my Designer Stitch Pattern Support Group over on Facebook. Why not come over and say hello to us all. xx
WHAT ARE DARTS ?
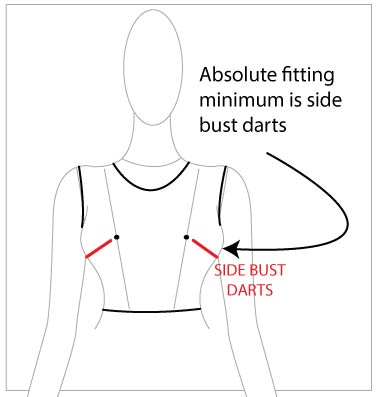
The above image – left – details the ABSOLUTE minimum of dart placement that you should have on a bodice. The minimum for fitting – and I say MINIMUM for a reason – are the side bust darts. They help contour the garment – alleviate drag – and also stop the centre front of a garment lifting.
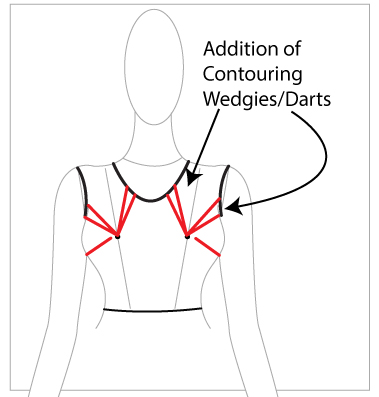
The above image – right – are the minimum CONTOUR dart/wedgies that you would need to have if you were fitting a sleeveless garment with a lowered neck. These are called contour darts or wedgies – as they facilitate the contouring of the garment over and around your entire bust mound.
The darts added to the armhole stop your garment gaping around the side bust mound. The darts added to the neckline stop the garment gaping as the bodice comes off its contour of the bust mound into the flat surface of your upper chest area.
BUT WHY DARTS ?
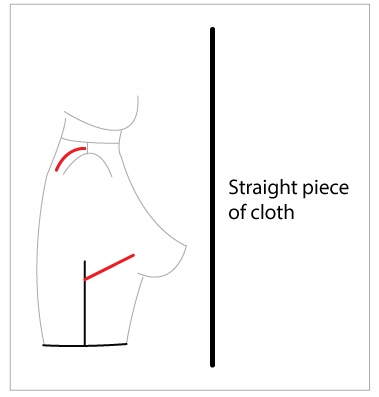
The image on the left shows a side view and a straight piece of cloth. A body is 3 dimensional yet the cloth is 2 dimensional.
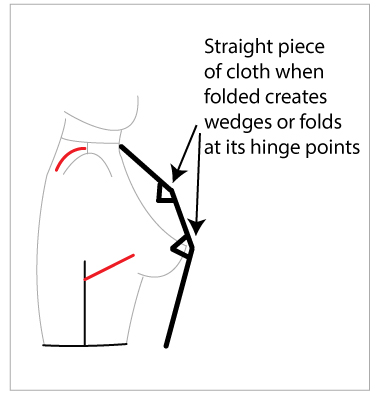
When the cloth has to fold over the body it creates folds or wedgies on itself at its hinge points. So really the folds and wedgies it makes are just the DARTS that we need. The cloth tells us what it wants to do.
WHAT HAPPENS WHEN THERE ARE NO DARTS IN PLAY ?
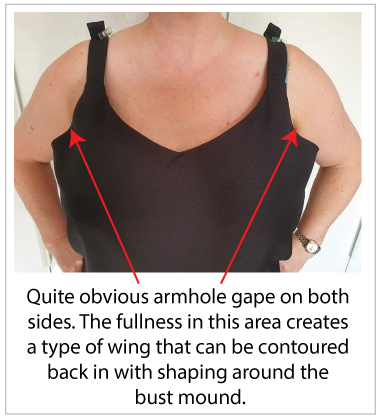
A garment that has no darts in play will never EVER fit your body properly. And the above images are perfect examples of this.
Over on the Sew Busty Facebook Group our Anouska W posted the above pics asking for fitting advice. The image on the left shows massive gaping in the side armhole. It is quite obvious.
The fullness in this area creates a type of “wing” that can be contoured back into the bust mound with shaping. And what shaping do we use – well DARTS OF COURSE !!
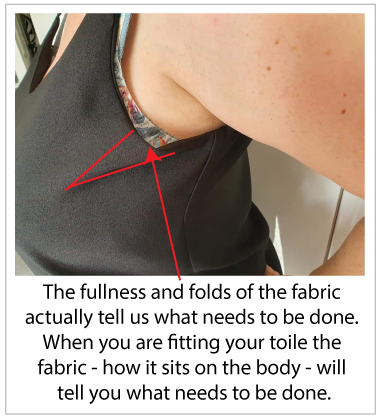
The image on the right shows that the toile that Anouska made is actually telling us what it wants to do. The fullness and folds of the fabric are showing us that it wants to fold down on itself – hence creating that all important contour – in the form of a dart.
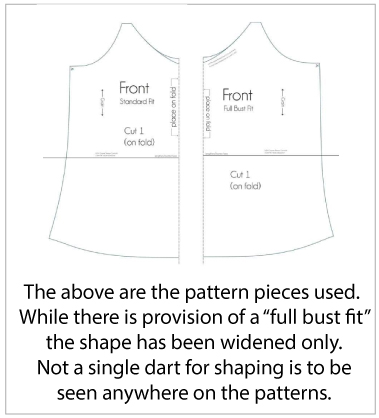
I asked Anouska to send me a pic of the pattern pieces that she used. As you can see above there are no darts to help contour the pattern piece around the body. There is a separate pattern piece provided for a “full bust” – but this has just been done by widening the pattern.
Not a single dart for shaping is to be seen anywhere on the pattern.
ADDING CONTOUR DARTS TO YOUR PATTERN PIECE.
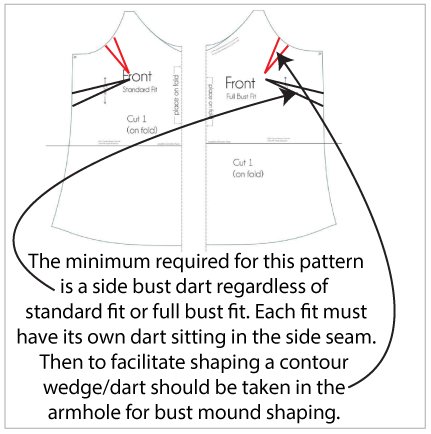
The absolute minimum required for this pattern should have been in the form of side bust darts regardless of standard fit or full bust fit.
Each fit must have its own side bust dart. And the full bust fit would have a bigger side bust dart than the standard fit.
Then to facilitate the shaping around the side bust that Anouska’s toile is telling us it needs – a contour dart/wedgie – should be then taken for side armhole bust mound shaping.
And you may ask – How much should this be ?. The toile will tell you.
Whatever you have pinned out to create your new contour dart is the full dart value amount.
Pinning out shape on your toile is the best way to ascertain how much shaping is needed in any part of the fitting garment.

When adding your contour dart/wedgie to your pattern you must ensure that the dart is angled correctly – again your toile will tell you – and that it finishes its length at the bust apex point.
The above image is the front of my Raven Cami/Slip Dress pattern. I have already contoured my armholes with a fitting dart as you can see from the angle of the side seam and curve of the armhole.
If you need additional contouring you draw your contour dart/wedgie in position -as if it was a new dart – to the length to the apex.
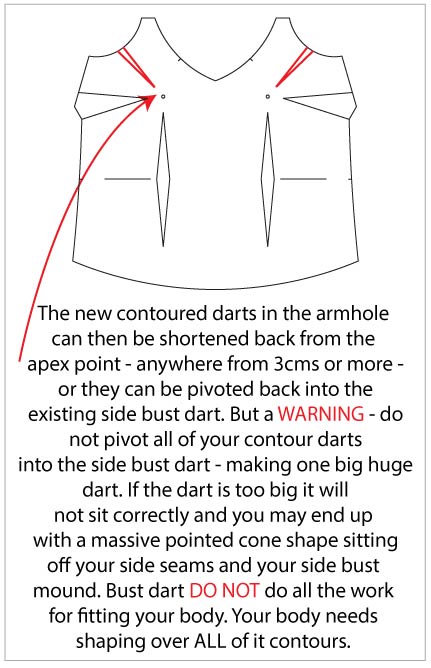
For the final pattern you now have a few choices.
You can either leave your new armhole dart in place as it is – but if so you must shorten this new dart back away from the apex to avoid pointy “boobs”. They are usually shortened back a minimum of 3 cms (1 1/4″) but this will be dependent on how it sits on your body. It may need more length or even made shorter. See what the toile is doing and then make your final decision.
Alternatively the armhole dart can be pivoted back into the existing side bust dart. But a HUGE WARNING !!!. DO NOT – and I repeat DO NOT pivot all of your fitting darts into your side bust dart. I see countless blogs and YouTube instructional videos advising this – and it is so so wrong.
Pivoting all darts into a side bust dart not only results in one massive DART – but you will have a dart that doesn’t sit correctly and may end up with a HUGE pointed cone shape sitting off your side seams.
And one thing I HATE that makes my eyes scared – it is pointy BOOBS.
Side bust darts should not – and DO NOT – do all the work for fitting your body.
Your body needs shaping over all of its contours.
Hence why darts are needed in key fitting areas.
I hope that you have learnt something by reading my story and please shout out if you have any thoughts to share.
The good thing about sewing and fitting our bodies – we always learn NEW THINGS.
Love to you all and please stay safe and well everyone xx
Cheerio my lovelies
Ann at Designer Stitch xx