Tutorial
The Correct Position of Buttons and Buttonholes
Hello to you today my lovelies and thank you again for joining me here on Day 6 of the series of Sedona Shirt Dress blog posts.

I hope that you enjoyed reading the last 5 days of blog posts and if you have missed them here are your links. They make great reading.
Day 1 – Sedona Shirt Dress Inspiration and Influences Post.
Day 2 – Sedona Shirt Dress Tester Roundup Part 1
Day 3 – Sedona Shirt Dress Tester Roundup Part 2
Day 4 – What is a Concealed Button Wrap – which is one of the main features of the Sedona Shirt Dress PDF sewing pattern.
Day 5 – How to Create a Separate Button Stand on the Sedona Shirt Dress.
I today’s post I am going to talk to you about the Correct Position of Buttons and Buttonholes – and I am going to recap a few things covered in yesterdays blog post to start us off.
When I drafted the front body of the Sedona Shirt Dress I made the button wrap width 1.5cms (5/8″) – it is drafted as an extension beyond the Centre Front Line. A minimum standard of button wrap width is 1.2 cms (1/2′) as anything smaller doesn’t allow for the centre front to wrap over and hold the garment.
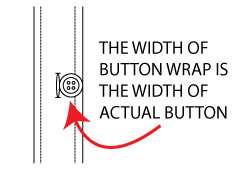
Also the width of the button wrap must reflect the recommended size of buttons.
As the above pic shows the button wrap width must be the same size as the width of button – so if we sit the buttons left edge against the centre front the buttons right edge must be inline with the garments finished edge.
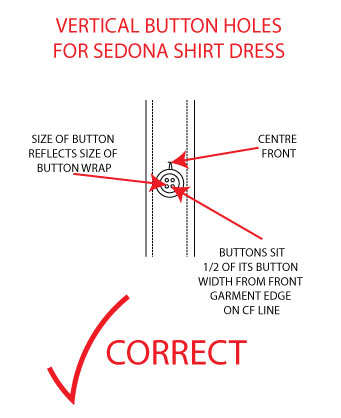
The above pic highlights that when a button/buttonhole is made and garment is wrapped and buttoned the button sits nicely on centre front.
My eyes get very scared when I see a buttons edge touching the edge of a garment or even sitting off the button wrap… And I see this all the time on both Facebook and Pinterest…..UHG !!!!
Why a Vertical Buttonhole ?
Button stands by nature are a narrow pattern piece that is restrictive in width – for the Sedona Shirt Dress the narrowness has been restricted by the top stitching on the left side of the folded wrap to create its concealment. The standard button stand – as detailed in yesterdays post – How to Create a Separate Button Stand on the Sedona Shirt Dress – also has a restrictive width.
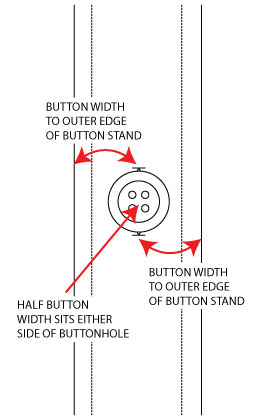
Button stands reflect the width of the button and are generally twice as wide as the diameter of the actual button. The button sits in the middle of the button stand – the button straddles the buttonhole – in essence one 1/2 of the button width sits either side of the button hole.
Why not a Horizontal Buttonhole ?
Due to the restrictive width of button stands a horizontal buttonhole cannot be placed within the width. Remember a button stands width is based on double the width of the button itself.
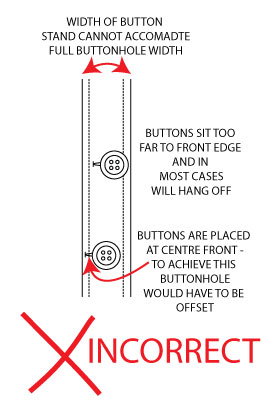
You will see in the above diagram if a horizontal buttonhole was made in the width of the button stand the button would sit off the end of the stand. A button must sit on Centre Front and not hang off the garments edge.
If the buttonhole was offset to ensure the button sat at Centre Front the buttonhole would have to be offset and would have to be stitched across the button stands vertical construction seam which is not good practice and quite ugly.
First Button is at Point of Strain !!!
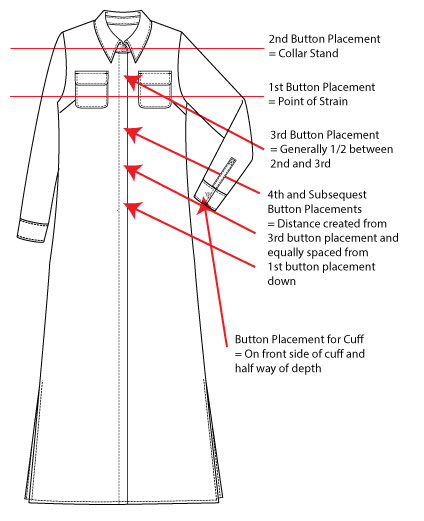
When marking positions of buttons and button holes the point of strain – usually at bust apex or nipple – is the first. Then the second – in the Sedona case – is the collar stand. Then an equal measured distribution of buttons and button holes is done from then on wards.
The Sedona is an easy to wear dress – if you were placing buttons on a more fitted garment you would also consider the waist and the hips also points of strain and mark accordingly.
I hope that you found the above informative and now you have a clear insight as to why vertical buttonholes are only appropriate for button stand garments. And that points of strain in relation to placement is also a key factor.
I will be writing a future blog post about horizontal buttonholes and the infiltration of the RTW vertical buttonholes on the garments of home sew’ists.
And tomorrow keep your eyes out for the final blog post in the Sedona Shirt Dress series- Perfect Patch Pockets Every Time
Cheerio
Ann at Designer Stitch xx
Oh – ps !!!…. The finer details : On Sale for a limited time only – $8.75 (US)
multi-sized pattern – including Cup Size B thru DD (E) :
(AU/UK) 6 – 26
(US) 2 – 22
(EU) 34 – 54
Intermediate Sewing Level.
https://designerstitch.com/shop/sedona-shirt-tunic-dress
Thanks!